A First Finish for a Small Indoor Keepsake Box
Choose a finish for a small indoor keepsake box by settling color and sheen, checking product compatibility, and testing the complete look before coating the box.
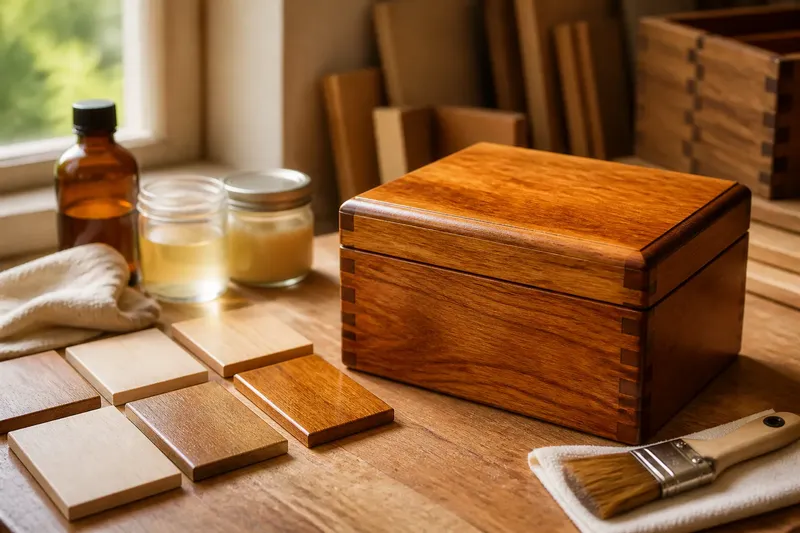
A clear finish can make a small indoor keepsake box look warmer or glossier than its bare wood. For a first finish on a small indoor keepsake box, decide whether you want to preserve the wood’s natural color, add color, or change its sheen before opening a can.
Think of the finish as a clear cover on a drawing: it protects the surface, but it can also change what sits beneath. A lid makes that change easy to notice, so use an offcut from the same wood when possible.
Decide what the finish should change
Look at the box near a window and under its usual lamp. Ask whether the wood already has enough character, whether you want a different color, and how much reflected light you prefer. These are separate choices. A clear finish can deepen the wood’s appearance without stain, while a colored finish can still have a matte, satin, or glossy sheen.
- Natural look: Choose a clear product intended for interior furniture if the wood’s existing color and markings are the point. “Clear” does not always mean invisible; many finishes warm or deepen the appearance.
- Added color: Consider a stain or another product made to color bare wood. Check that it is compatible with the protective coat you plan to apply.
- Specific sheen: Choose among the product’s available sheen levels. Sheen describes reflected light, not color, and a glossier surface may make marks easier to see.
Let the most important choice lead. If color matters most, settle it before choosing a topcoat. If the wood already looks right, leaving it unstained is a deliberate finish choice.
Match the product to the box and its use
Read the label for intended use, surface preparation, application method, drying conditions, and compatible layers. An interior-furniture finish is a sensible starting point for a box kept indoors. Products differ: some are wiped on, some brushed, and some are designed to color rather than protect. Choose a system you can apply to both broad faces and narrow edges.
Oil-based and water-based clear finishes can differ in appearance, odor, cleanup, and how they affect wood color. A water-based product may preserve a lighter look more closely, while an oil-based one may add warmth; the exact result depends on the wood and product. Check the label and try the finish on a matching offcut rather than treating either description as a promise.
Wax and oil products can suit some indoor objects, but they are not interchangeable with film-forming finishes. Their appearance, upkeep, and resistance to handling vary by product. Consider how the box will be used: a box that stays on display has different demands from one whose lid is opened often. Choose directions that fit the use, not just a familiar product name.
Stain can add color, but it may emphasize differences in how sections of wood absorb it. A colored product that forms a surface layer can behave differently. For an opaque or painted look, choose a product intended for that result instead of expecting transparent stain to hide the wood.
Prepare the surface for the chosen look
Make the surface consistent rather than chasing perfection. Remove glue residue, pencil marks, and dust before finishing. Glue can block color and leave a pale patch; dust can become visible as roughness or specks. Inspect the lid and sides under a bright, angled light, then correct visible defects.
Sand with the grain using an appropriate abrasive, and progress through grits in a controlled way. Follow the finish maker’s instructions for the final sanding level. Very smooth wood may take some color products unevenly, while sanding scratches can show after a coat. A consistent surface matters more than an unusually high grit number.
For a natural look, check the broad lid for scratches and glue marks. For added color, inspect end grain and corners as well as the faces, since these areas may absorb color differently. Sand exposed edges lightly if you want the box’s outline to remain crisp.
Remove sanding dust with a method suited to the product and wood. A clean, dry cloth or vacuum may be appropriate, but some finishes call for a specific approach. Check the directions before using a solvent or damp cloth, because residue or moisture can affect the next coat.
Test the complete finish on an offcut
A scrap from the same board lets you judge the color and sheen without making the lid your first sample. Prepare it as you plan to prepare the box, including sanding, stain if used, and the intended protective coat. Assess the complete combination: stain alone can look different from stain under a topcoat.
Say you have a pale maple box and want it to sit quietly on a shelf. Your starting point is an unfinished box and a matching maple offcut; the goal is to avoid a strong color shift. Sand the offcut as directed, apply the proposed clear interior finish according to its label, and wait for the stated condition before judging it under the shelf’s usual light. If it looks warmer than you want, compare a different suitable clear product on a fresh sample; if the second sample better matches the goal, use that product on the box. The visible result is a more informed choice before the lid is coated, not a promise that the box will look identical.
If no matching offcut is available, a separate scrap of unrelated wood is less useful for judging color because wood species and grain affect absorption. Use a hidden part of the project only if it can receive the same process and the product directions allow it. Otherwise, keep the finish choice simple and avoid combining unfamiliar products on the box.
Apply finish carefully to small surfaces
Excess finish is easy to spot on a small box. Set it on a protected, level work surface and arrange the parts so you can reach the intended faces without touching wet areas. Use the brush, cloth, or applicator named in the directions. Spread a modest amount evenly and watch for finish collecting at corners.
If the lid is removable, finishing it separately can make access easier. Keep its orientation clear so the visible face and edges receive the intended treatment. Do not force or pry off an attached lid or delicate hardware. Masking may help protect an area only if the product allows it and the tape can be removed without damaging the surface.
Do not try to build the result with one heavy coat. Follow the label for recoat timing, sanding between coats, ventilation, cleanup, and handling. A surface that feels dry may not be ready for another operation. Leave the box open or assembled as the product directions recommend, and keep finished mating surfaces from sticking together.
Finish can change how the lid meets its base. A heavy layer on a close-fitting rim may make opening or closing less smooth, while finish inside the box will show whenever it is opened. Treat the rim and interior deliberately. Keep finish away from a fabric or paper insert unless the product is suitable for that material.
Choose a sheen that suits the box?
Choose sheen by looking at how much reflected light you want and how clearly you want surface marks to show. Matte reflects less direct light than gloss, but it does not conceal poor preparation or uneven application.
Does matte finish hide every surface mark?
No. Scratches, dust, and uneven application can still show. Consistent sanding and clean application matter more than relying on sheen to conceal flaws.
Will a clear finish keep the wood exactly as it looks unfinished?
Not necessarily. A clear coating may deepen or warm the wood’s appearance. Check a prepared sample under the light where the box will be displayed.
Can stain and a clear topcoat be combined?
Often they can, but the products must be compatible and used in the order their labels specify. Let the color layer reach the stated condition before applying the protective coat.
When should the box be put into use?
Follow the manufacturer’s drying and curing guidance rather than judging only by touch. Until the finish is ready for handling, keep the box in a clean, ventilated place and do not store keepsakes inside it.
Keep the first finish simple
For a first indoor keepsake box, one compatible color choice and one protective finish are easier to manage than a stack of experimental layers. A clear coat can preserve the wood’s basic character; stain with a compatible topcoat can add color and protection; sheen can tune the final reflection. Avoid mixing products unless their directions support that combination.
Before starting, confirm the product’s surface, ventilation, cleanup, and disposal directions. Follow local rules for disposing of finish-soaked materials, and keep containers and applicators away from children and pets. If you are uncertain about a product’s safe use or handling, ask its manufacturer or a qualified professional.
Once a sample gives you the color and sheen you want, use the same preparation and product sequence on the box. Apply lightly, follow the label’s timing, and let the finish reach its stated readiness before loading the interior. For a small indoor keepsake box, that final check of the product directions is part of choosing the finish, not an afterthought.