Reading Grain Before You Choose a Cut
Reading grain before you choose a cut helps you position a small project’s pattern, choose its visible face, and place the outline with greater confidence.
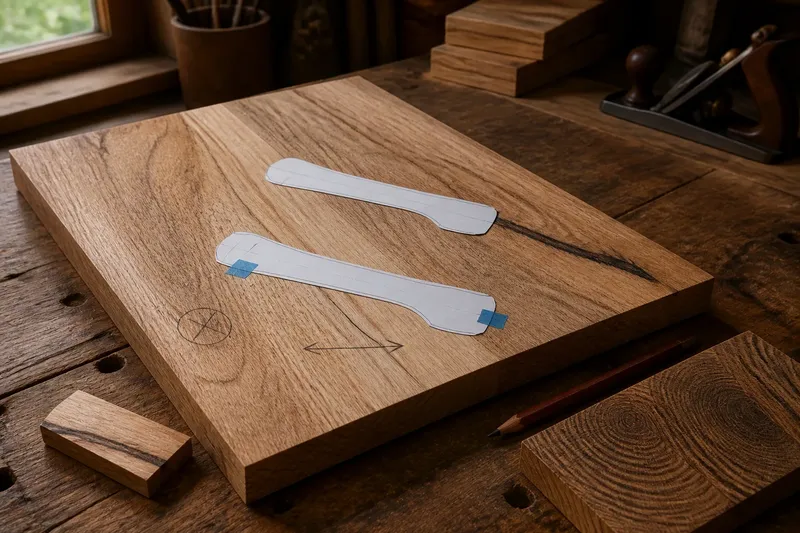
Reading grain before you choose a cut helps you decide where a small project’s lines should lead the eye. Turn the board under good light, follow the grain across its faces and edges, and compare possible outline positions before you mark the wood.
Compare the board’s faces and edges
Set the board on a stable surface and inspect both broad faces. Grain may run in fairly straight lines, sweep in a curve, or break into irregular patches. The faces can look different even though they come from the same board.
Notice contrast as well as direction. A dark line against pale wood may become the main feature of a small object. A quieter area may suit a simple shape better than a knot or abrupt color change at its center.
Check the edges to see how the lines travel through the board’s thickness. Rotate the board and change the light angle; faint lines often become easier to follow from another view. Look at the end grain, too. Its curved growth-ring pattern can help you judge whether the face grain stays straight, arcs, or changes near the area you plan to use.
Decide what the grain should do in the finished shape
Choose what you want someone to notice first. Long, steady lines can emphasize the length of a narrow tray or handle. A curved line can echo a rounded edge. Bold contrast may give a plain form character, but it can compete with a small detail.
Consider which face will usually be visible. Put the most appealing pattern there, and check that it remains inside the outline after cutting. If both faces will show, compare them and choose the better visual compromise.
Grain direction can also affect cutting. A tool moving against the fibers may lift or tear them instead of slicing cleanly. Try the planned cut on an offcut from the same board, keep the work supported, and follow the tool maker’s safety instructions. If the board has a crack, loose knot, or other concern that makes its suitability uncertain, set it aside or ask a qualified woodworker.
Move the template before marking the board
Place a paper template or reusable shape on the board. Shift and rotate it while watching where the grain crosses the outline, where knots would land, and whether the pattern appears to continue naturally between parts.
For a long, narrow piece, try aligning its length with the main grain direction where the design allows. For a rounded piece, compare several positions; a diagonal layout may make the pattern feel more balanced. Use low-tack tape or a light pencil line to compare options without committing.
Mark the intended show face and add a small arrow for the grain direction if you will set the piece aside. Think of grain like stripes on a tabletop: turning the shape changes which way the lines lead the eye, even though the board stays put.
Check these grain questions before cutting?
Which way should grain run on a small handle?
When the design allows, align the handle’s length with the board’s main grain direction so the lines follow its form. If the grain sweeps across the outline, shift the template and compare the visible pattern before choosing.
Can a knot or bold line improve a simple shape?
A bold line can become a deliberate feature if it sits where you want attention. Treat knots and defects separately: an attractive pattern does not make a questionable area suitable for the piece.
Why does a cut tear fibers in one direction?
A cutting edge may lift fibers when it works against their direction, especially where the grain changes. Try the cut on an offcut to see how the board responds, then adjust the approach or choose a suitable tool.
Should both faces of a project match?
They do not need to match exactly. Compare both if they will be visible, then decide whether the reverse should echo the show face or have a quieter pattern.
Use this pre-cut grain checklist
- Inspect both broad faces under good light. If one face has a pattern you want to show, mark it as the show face; otherwise compare the edges and choose the calmer face.
- Follow the grain across the edges and end grain. If the direction stays clear, draw an arrow to preserve it; if it changes near the outline, rotate or shift the template and inspect again.
- Check the planned outline for knots, cracks, and rough defects. If any feature makes the material’s suitability uncertain, move the shape to sound wood or set the board aside and ask a qualified woodworker.
- Place the template and check where strong lines cross the shape. If they lead attention where you want it, keep that position; if they crowd a detail, try another orientation.
- Compare the show face with the reverse. If both will be visible and one arrangement works on both, keep it; otherwise choose the better compromise for the object’s usual position.
- Try the planned cut on an offcut from the same board. If fibers lift or tear, adjust the cutting direction or approach; if the result is clean, proceed with the planned layout while following the tool maker’s instructions.
- Lift the template and inspect the pencil outline against the grain. If the shape still reads clearly, keep the mark; if a curve or line looks misplaced, erase it and mark a revised position.
Work through a handle layout before committing
Say you have an invented, hypothetical handle blank with straight grain along its length, a dark curved line near one edge, and a paper template that fits in two positions. First, inspect both faces and choose the quieter face for the underside. Next, place the template in the first position; the dark line crosses the narrow grip, so move it to the second position. There, the line follows the handle’s outer curve and the grip remains visually quiet. Check the edges and end grain, mark the grain arrow and show face, then test the intended cut on a same-board offcut. The resulting decision is to use the second position if the trial cut behaves acceptably; if fibers lift, adjust the cutting approach before cutting the blank.
Keep the chosen layout clear at the tool
Once the template sits well, mark the outline, show face, grain arrow, and any area to avoid. Lift the template and check the outline against the grain again; a misplaced curve is easier to spot when the pattern is not covered.
Confirm that the shape fits within suitable material and that the board is supported for the planned tool. Follow the manufacturer’s instructions, and seek qualified help for any safety concern. Keep the offcut with the project if you may need a matching part later; it gives you a useful reference for the board’s grain.